In this article, we’ll take a look at how to play the C guitar chord and some C chord variations that will make this great beginner chord easy to find on the fretboard and use in various genres. The C chord and the key of C are stepping stones to launch your guitar playing skills.
You will see and learn in this article that there are many ways you can play a C chord on your guitar to achieve different results.
Table of Contents
1. C Major – Open Chord (Most Common)
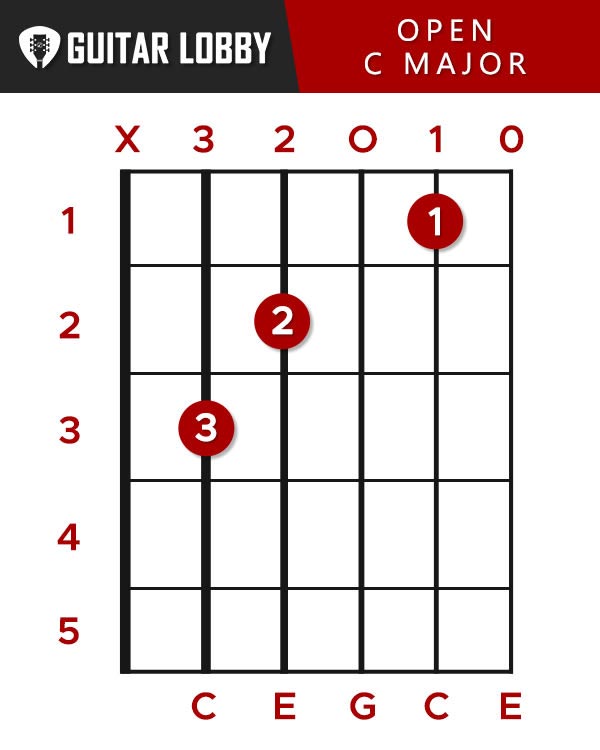
The most common shape of the C chord is the open C major. This shape is typically one of the first chord shapes taught to beginner guitarists and is an extremely popular chord shape across various music genres.
The fingering of the chord goes as follows:
- Put your third finger (ring) on the 3rd fret of the A string
- Put your second finger (middle) on the 2nd fret of the D string
- Put your first finger (index) on the 1st fret of the B string
- Leave the G string and the high E string open and strum all strings except the low E.
The open C chord shape is a great first chord to learn on guitar. Try, at first, to pick each individual strings to see if there are any buzzes and if the open G and E strings ring out.
In the video below, you will find more detailed insight on the fingering and some tips on getting the C major chord to ring out and sound great without too much effort.
Tips, Tricks, Common Challenges
1. The stretch between the middle and ring finger can be difficult.
The index and middle fingers have an easy job and do not do much of a stretch. However, the ring finger on the 3rd fret of the A is a bit harder to get right for beginners.
If you find difficulties on this one then try to adjust your guitar positioning and switch to the classical guitar position. In this position, you hold your guitar on your left leg (opposite for lefties) and point the guitar neck up.
What this does is ensures a more natural hand stretch and ensures less pressure on the hand.
2. The open G and E strings are not ringing.
In this situation, the position explained above helps a lot. Try to pay close attention to the wrist and to get your hand into a good position in which the fingers are standing straight above the fretboard. This way they do not touch the string above or below them.
3. Muting the low E string
As explained above you should play from the A string and below. If you are still working on your right hand precisions then use this trick. Slightly touch with the tip of your ring finger the bottom of the low E string, just enough that you are making contact and the low E will not vibrate even if you bump it when you strum.
Expert Insight
The C major chord is a great “passing” chord which means its that you can easily get to the C major chord from other chords and vice-versa with only a few finger movements. For example, From the C major position take your ring finger and place it on the second fret of the G string – there you have an A minor chord.
From the C major position take the ring and middle finger and place them 1 string up their original position and also put your pinky on the 3rd fret of the high E, there you have a G major chord.
Also, worth knowing that you will likely hear some guitar players refer to these open chord positions as “cowboy” chords
Brief Music Theory
Let us introduce you first to one simple concept. Intervals and the major scale.
An “interval” is the distance between 2 notes, it can be half step (1 fret) or full step (2 frets)
In a major scale, there are 7 notes and each of them corresponds to a number from 1 to 7. The distance between the 1st note and the 2nd note is a “second”, between the 1st and the 6th is a “sixth” and so on.
The notes of the C major scale are the following:
| C | D | E | F | G | A | B |
| 1 | 2 | 3 | 4 | 5 | 6 | 7 |
The notes that formulate a major chord are always root or 1st, 3rd, and 5th notes in the key signature. So, the C major chords are formed with C, E, and G at various locations on the fretboard.
One of the reasons that the C major scale is the first choice of many teachers for beginners is that the scale has only natural notes. That means there are no sharps or flats to make it harder for you.
2. C Major – Variation 1
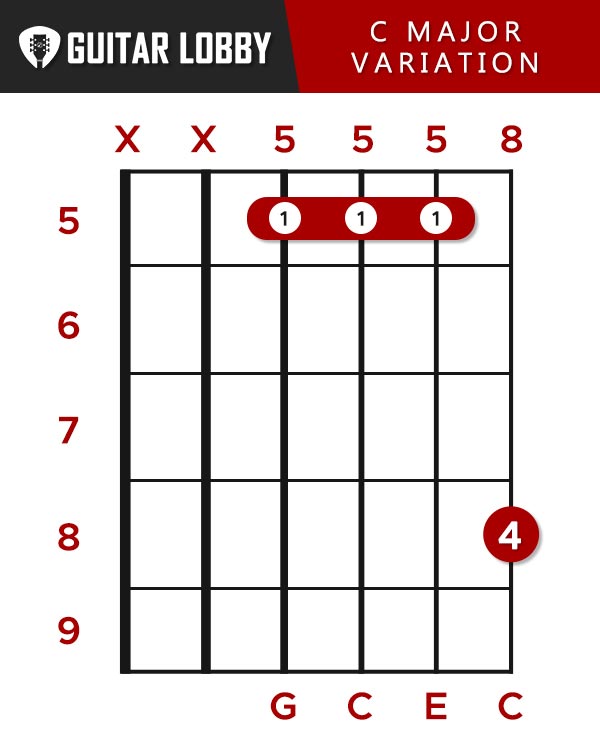
The first C Major Chord variation we’ll look at does not use the bass notes:
- Barre with your first finger (index) the 5th fret of the D, G, B
- Place your fourth finger (pinky) on the 8th fret of the high E
- Strum to 4 high strings leaving the low E and A strings muted
The following video will give you a better look.
(video 2 Coming Soon)
3. C Major – Variation 2
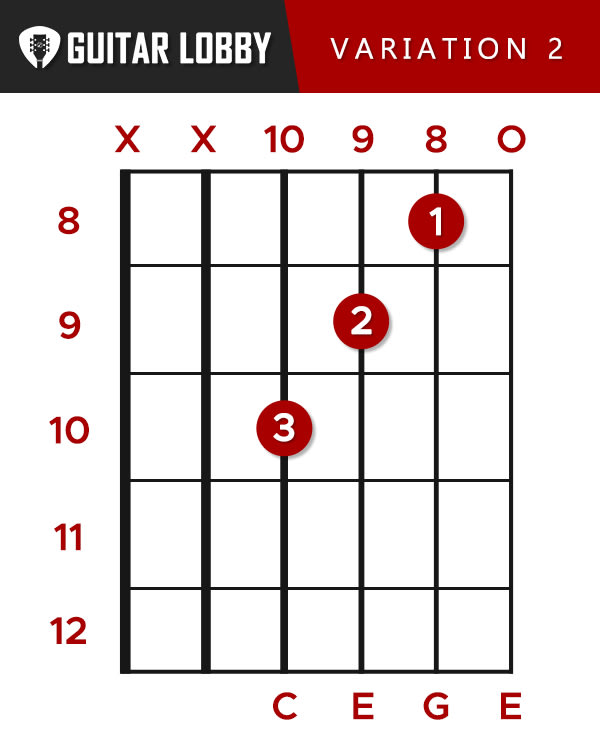
Another common C chord guitar shape uses some elements of a barre chord and also an open E string. The open string is what makes the chord sound very unique and bright.
The fingering is as follows:
- Place your third finger (ring) on the 10th fret of the D
- Place your second finger (middle) on the 9th fret of the G
- Place your first finger (index) on the 8th fret of the B
- Play the high E open
We prepared this video for you to learn the details.
(Video 3 Coming Soon)
4. C Major – Barre Chord
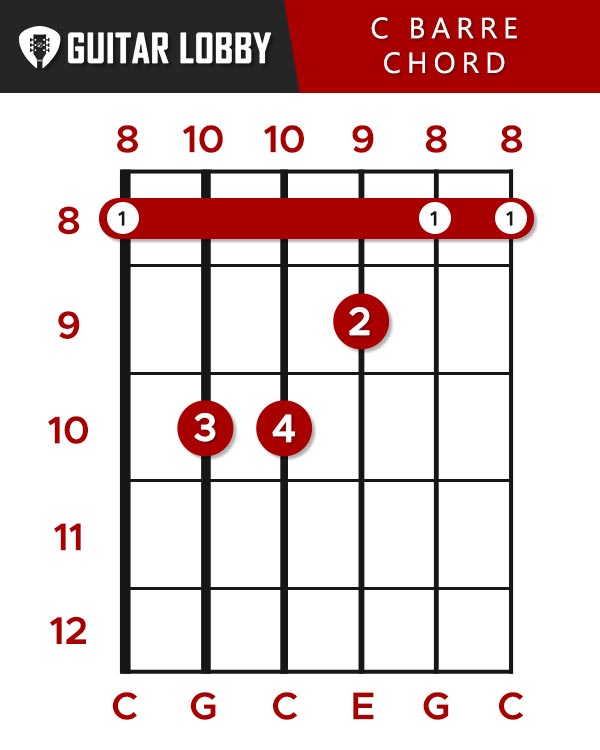
Maybe the most challenging C major chord shape to get for beginners is the C Major barre chord. If you are new to the concept of barre chords then this chord is a great starting point.
A barre chord shape indicates that the first finger (index) will become a sort of a barre and imitate what the guitar nut does – basically lay across all the strings to play a similar role as a capo.
The fingering for the C major Barre chord is the following:
- Place your first finger (index) as a Barre on the 8th fret and press down all the strings.
- Put your second finger (middle) on the 9th fret of the G string.
- Put your third finger (ring) on the 10th fret of the A string
- Put your fourth finger (pinky) on the 10th fret of the D string
- Strum 1 by 1 to make sure each note rings out.
Keep in mind that the root of the chord in this shape of the chord is found on the low E string. That’s why the chord starts out on the 8th fret where the C note is located.
5. C Major – Barre Chord Variation 2
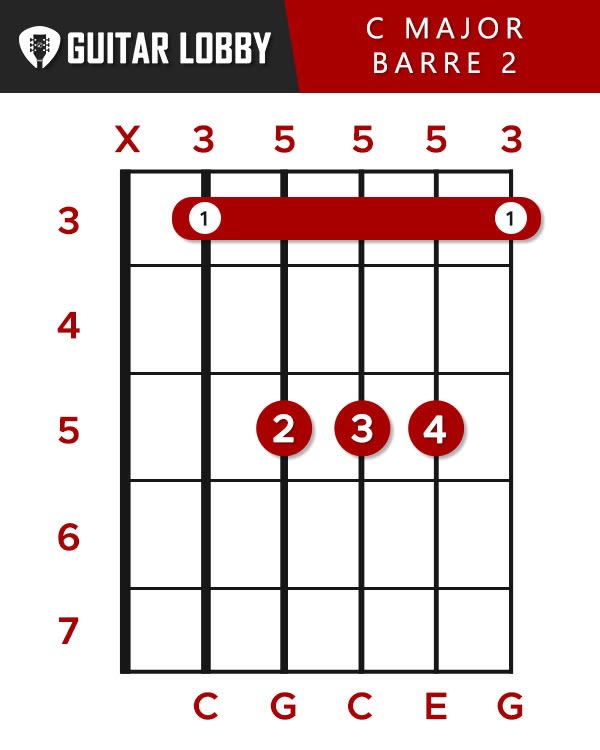
The other common way to play the C major barre chord is with the root on the A string. This time you bar only 5 strings and leave the low E string out of the chord.
The fingering for this 2nd barre chord is the following:
- Put your first finger (index) as a Barre on the 3rd fret of the A string
- Put your second finger (middle) on the 5th fret of the D string
- Put your third finger (ring) on the 5th fret of the G string
- Put your fourth finger (pinky) on the 5th fret of the B string
- Strum and make sure the low E string stays muted and all other strings ring out
There is also another way to play the chord which involves barring with your pinky or ring finger. This fingering sacrifices the low E string since it’s blocked by the barre, but it still sounds great!
The fingering looks like this:
- Put your first finger (index) on the 3rd fret of the A string
- Put your third (ring) finger or fourth (pinky) as a barre on the 5th fret of the D, G, B strings.
Perhaps this shape is easier for you. You can choose to play the chord however you see fit based on the shape you find more comfortable.
Have a look back at the video below to see both C barre chords in action and help you work out the details.
Tips, Tricks, Common Challenges
The challenge of the C major barre chords is to get the barre just right and not tire your hand too much in the process.
One trick in helping you barre the string when playing the root E position is to pay attention to your thumb position. Try to place it as much in the middle of the neck as you can.
One other thing that works if you feel that the high E and B strings are not ringing out properly is to raise the index finger just a bit. This makes sure the part of the finger with more flesh in it blocks the string better.
Expert Insight
Bar chords tend to tire your hand easily. Usually, it’s mostly sore fingers and some pain in the hand/wrist.
If you feel that you are experiencing some pain in the inner part of the arm, however, try to take a short pause and start again after some minutes.
Play a Rock C major Chord
Rock chord, also known as power chords, sounds especially great when played with a high gain tone. This C chord guitar shape is extremely popular in rock music and work in both major or minor situations.
Play the notes as follows:
1. Put your 1st finger (index) the 8th fret of the low E string
2. Put your 3rd finger (ring) on the 10th fret of the A string
3. Put your 4th finger (pinky) on the 10th fret of the D string
4. Rest your index finger gently over the G, B, and E strings to mute them and strum the chord. Only the low E, A, and D string should ring out when you strum
6. C Power Chord
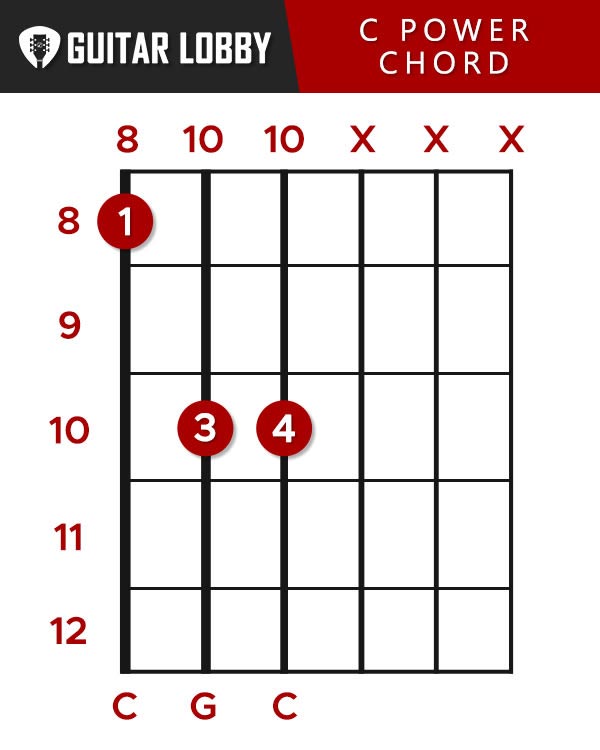
Have a look at the video to see the C power chord in action.
(Video 5 Coming Soon)
Tips, Tricks, Common Challenges
The main challenge of playing power chords lies in muting all the other strings except for the ones you are playing.
You can do this by gently resting your index finger on top of the strings you are not playing. This way it’s guaranteed that you can strum all the strings without hearing any unwanted notes and also have a nice percussive effect when doing it.
Expert Insight
When playing the C power chord with a distorted/high gain tone apply some palm muting to get a nice percussive effect.
Palm-muting is basically resting your right hand on the bridge of the guitar and gently touching the strings.
The closer to the bridge or the lighter your press – the lighter is the muting. The opposite is also true. Balancing muting and unmuting is generally a great way to add dynamics to your playing.
7. C/G Chord
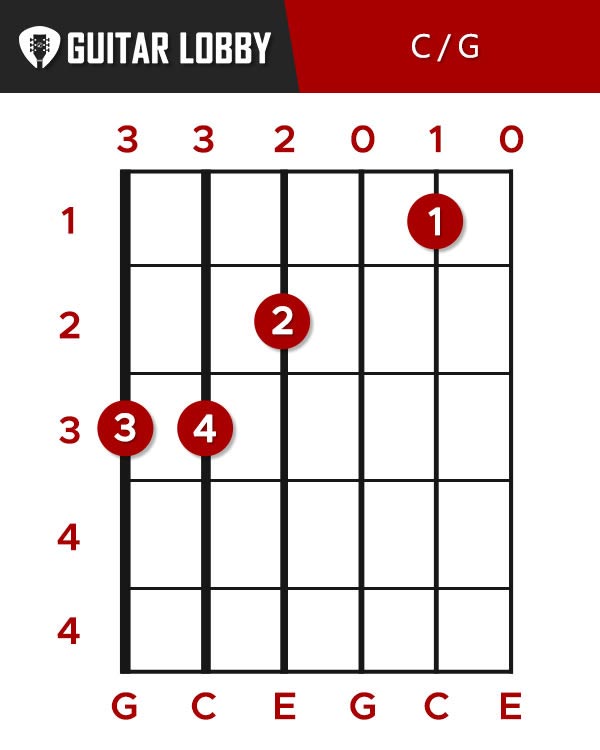
The C major chord holds many possibilities, some of which are great for beginners too.
The first variation is similar to the open chord but with added 5th. If you read back above where some basic music theory is covered, the 5th note in the C key signature is the G note. So this C guitar chord variation is basically an open C chord with an added G on top. You can find it written as C/G in some chord charts.
The easiest way to play this chord is the following:
- Pinky (4th finger) on the 3rd fret of the A string
- Ring finger on the 3rd fret of the low E string
- Middle on the 2nd fret of the D string
- Index on the 1st fret of the B string
- Strum all strings and make sure each note rings out
Have a look at this video for a more detailed insight on the chord
(Video 6 Coming Soon)
8. CAGED C Chords Guitar
The CAGED system is a very good way of learning the fretboard and chord shapes. The CAGED system basically teaches you that all chords can be played based on the 5 different chord shapes that make up the system’s name.
Below you find the chord shapes we are referring to.
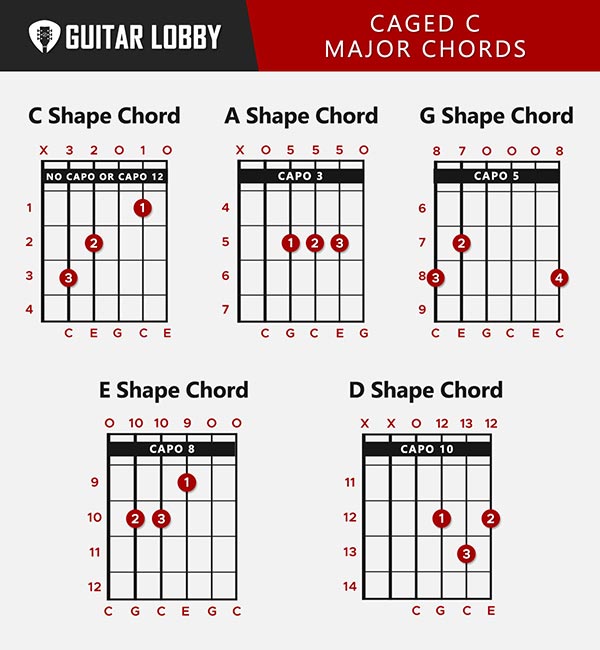
For example, you can play the C guitar chord as a standard open C shape, or you can play it in the shape of an A chord somewhere else on the fretboard – what’s important is that the root is still C and the notes are the same three – C, E, and G.
We prepared the video below to help you build a better understanding of this concept.
(Video 7 Coming Soon)
Tips, Tricks, Common Challenges
The CAGED system repeats some of the chords you might already know. What you should do is visualize the root note in each of the strings and build the chord shape that corresponds to that.
The biggest challenge is memorizing where all the C notes on the fretboard. Spelling out the names of the notes in the fretboard can help.
Expert Insight
Don’t be distracted by the unusual fingering of some of the chords in the CAGED system, just imagine there is a virtual capo on the fretboard that you replace with your index finger.
9. C7 Chord – Blues Chord
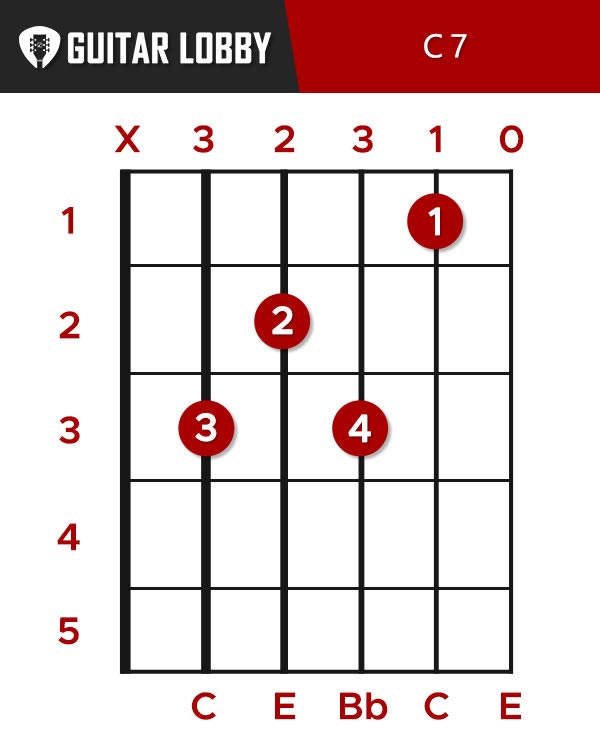
The C7 chord is perfect to add a bluesy feel to your music and also is very easy to play. What makes it different from the open C chord is just an added Bb note played by your pinky on the G string
- Place your third finger (ring) on the 3rd fret of the A string
- Place your second finger (middle) on the 2nd fret of the D string
- Place your first finger (index) on the 1st fret of the B string
- Place your fourth finger (pinky) on the 3rd fret of the G string
- Make sure to slightly touch the low E string with the tip of your ring finger to mute it
Be careful not to mistake the C7 chord with a Cmaj7 chord. They are both major chords but the Cmaj7 chord is a different chord with a different note on it which can drastically impact the effect it has on listeners.
Check out this video for some more details on this great sounding C7 chord.
(Video 8 Coming Soon)
Popular Related Article: B Guitar Chord Guide
C Major Chord On Electric Guitar
What is the difference between the playing of the C major on electric and acoustic? The electric guitar has a variety of tones and in some of them playing the whole notes of the C major chord doesn’t sound quite as good.
For example, when playing in a band with a bass player you should probably leave the bass notes to him. This can also be the case if you have a second guitarist playing rhythm. Sometimes if you are playing lead guitar it’s best to leave out the notes of the Low E and A strings that make up a C major chord so that you can “cut” through the mix. Try only placing a small bar on the 8th fret on the B and high and also place your middle finger on the 9th fret of the G string.
On the other hand, If you are the rhythm guitar player, your role is to fill the mix with mids and lows and keep the rhythm chord progression. In this case, playing power chords, which are exclusively rooted on your low E and A strings, can often be the best approach.
Have a look at this video to understand the concept better.
(Video 9 Coming Soon)
Tips, Tricks, Common Challenges
If you are jamming with another guitar player then it would be great if both of you were playing different chord shapes of the C major in different areas of the neck. Having a variety of sounds coming out of 2 guitars makes the jam chords sound much better.
The chord variations that we learned that leave out the A and low E string sound great if the other player is playing the full chord.
Expert Insight
If you are playing with a distorted sound and want to switch from playing riffs on the lower notes to playing clean parts then try to play around with the volume knob.
Lower the volume knob to achieve a cleaner tone and that put it back up again to get a more grainy sound.
Final Tips on Playing the C Major chord
Mix up arpeggios with strumming
Spice a bit up the C major chord you are playing but adding some arpeggios along with the strumming. Arpeggios sound great and also are a great way to check if all the strings ring out nicely.
Know how hard to press the strings
Very often beginner guitar players tend to press too hard on the string. What that does is add extra unwanted pressure on the hand and also changes the pitch of the string. You should try to press only as hard the string rings out clean, no more and no less.
Don’t lift your fingers too much when changing chords
When changing from one chord to another, or even when playing single notes, beginner guitarists tend to raise their hand a lot from the fretboard than is necessary. This will only make the handwork harder and also delays the time from one change to the next. Pay close attention to the left hand and try to keep the hand as close to the fretboard as possible and work on making smooth transitions back and forth between chords.

My name is Chris and I’ve had a passion for music and guitars for as long as I can remember. I started this website with some of my friends who are musicians, music teachers, gear heads, and music enthusiasts so we could provide high-quality guitar and music-related content.
I’ve been playing guitar since I was 13 years old and am an avid collector. Amps, pedals, guitars, bass, drums, microphones, studio, and recording gear, I love it all.
I was born and raised in Western Pennsylvania. My background is in Electrical Engineering, earning a Bachelor’s degree from Youngstown State University. With my engineering experience, I’ve developed as a designer of guitar amplifiers and effects. A true passion of mine, I’ve designed, built, and repaired a wide range of guitar amps and electronics. Here at the Guitar Lobby, our aim is to share our passion for Music and gear with the rest of the music community.

Finally, i understand the theory of the 1,3,5,7 system!
As far as the explanation of theory, chord intervals, etc. on the page: meanwile i became a (bit) wiser man. thanks guys!